March 29, 2012

Bluetooth problem in Dell inspiron 1525 laptop?


Bluetooth problem in dell inspiron 1525 laptop? 
Every-time dell laptop user asks for help when they face this most painful dell laptop problems like why is my dell laptop bluetooth are not working? So first time on this online technical support blog, I am helping you to fix this most faced & commonly occurred dell inspiron 1525 bluetooth problem. Follow this step-by-step dell help for fix dell laptop bluetooth problem - 


Step1: First visit to official dell website and find & click on "Drivers & Downloads" link under 'support' menu at the bottom of the page.

Step2: Now select your dell inspiron 1525 model from list and confirm it.

Step3: Now click on network and download "Wireless 355 Bluetooth Module (Bluetooth 2.0 + EDR)" and save "R140135.exe" exe file.

Step4: Now execute R140135.exe and open the folder form following path "C:\dell\drivers\R140135\3100_216".

Step5: Now run the "Setup.exe" and when the driver ask for active bluetooth antenna, then click on "Cancel" button.

Step6: Now open the folder form following path "C:\dell\drivers\R140135\3100_216\Win32" and run "Inst.exe" exe file, then click on "next" button.

Step7: open the folder form following path "C:\Program Files\WIDCOMM\Bluetooth Software" and run "BTTray.exe" exe file it will appear in the system tray.

Step8: Finally turn-on your bluetooth icon, the installation process will start automatically, and after all click on "OK" button to finish all steps.

 
When you are installing driver on your system, it may be possible that software ask you to activate bluetooth option, never close this window before OK.

Now your issue would be resolve, if you will completely follow these help.

It’s time to restart your system again.

After reboot your system, I hope it will work.

Feel free to get online technical support to fix your computer problems. Just Call on Toll-Free number(1-866-541-1792) & get 24*7 expert help for online diagnostic and troubleshooting.
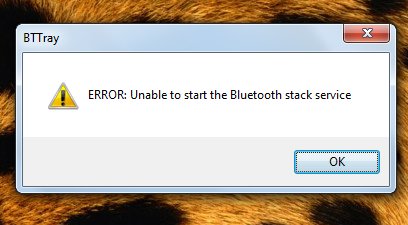
More related topic: How to add bluetooth to Windows 7 Ultimate >>

March 26, 2012

Why dvd drive not working in Windows 7


If you’ve recently installed Windows 7 or Windows 7 RC x64 and x86, you may have found a problem with the CD or DVD drive. Most commonly these will be either that the CD/DVD drive is not working, is causing some problem, has disappeared, is missing, not recognized, not found or you’re experiencing some general error. 

If you’re running Windows 7 x64 or x86 and find that your CD or DVD drive is not working, not being detected, missing or even gone. This windows 7 support blog will help you to fix DVD drive not working error with following step-by-step guide below -


Step1: Click "Start". 

Step2: Now type "regedit" in Run, registry editor will be opened.

Step3: In the navigation pane, locate and then click the following registry subkey:"HKEY_LOCAL_MACHINE\SYSTEM\CurrentControlSet\Control\Class\{4D36E965-E325-11CE-BFC1-08002BE10318}"(without comma) .

Step4: In the right pane, click on "UpperFilters". You may also see an UpperFilters.bak registry entry. You do not have to remove that entry. Click "UpperFilters" only. If you do not see the "UpperFilters" registry entry, you still might have to remove the "LowerFilters" registry entry. 

Step5: Now go to "edit" menu and click on "delete" button, then "Yes".

Step6: In the right pane, click "LowerFilters". 

Step7: Now again go to "edit" menu and click on "delete" button, then "Yes".

Now exit from registory editor and its time to restart your computer again.

Note: If you didn’t find the "UpperFilter" or "LowerFilter" in your registry this method may not be applicable to your computer. Go to command prompt and type "bcdedit /set loadoptions DDISABLE_INTEGRITY_CHECKS" and press "Enter".

Again restart your computer.

Feel free to get online technical support to fix your computer problems. Just Call on Toll-Free number(1-866-541-1792) & get 24*7 expert help for online diagnostic and troubleshooting.


Also find here  how to dual boot with Windows 7 and Windows 8 on a Computer.

March 23, 2012

Improve wireless network speed for free

If you want to boost the signal for your wireless network (WLAN) then try some of these tips for extending your wireless range and improving your wireless network speed and performance.

Tips1: The antennas supplied with your router are designed to be omni-directional; it means that broadcast in all directions around the router. If your router is near an outside wall, half of the wireless signals will be sent outside your home and much of your router's power will be wasted. If your router’s antenna is removable, you can upgrade to a high-gain antenna that focuses the wireless signals in only one direction. You can even aim the signal in the direction you need it most. Consider Belkin technical support to install belkin router; it is powerful and easy to install.

Tips to improve wireless network speed for free
Tips2: Sometimes your router can broadcast strongly enough to reach your computer but your computer can't send signals back to your router. To improve this, replace your laptop's PC card-based wireless network adapter with a USB wireless network adapter that uses an external antenna.

Tips3: You can place the wireless repeater halfway between your wireless router, modem router, or access point and your computer and you can get an instant boost to your wireless signal strength. Wireless repeaters extend your wireless network range without requiring you to add any wiring.

Tips4: Belkin router support manufacturers regularly make free improvements to their routers. Sometimes, these improvements increase performance. To get latest update for your router, visit your router's website. Find here how to setup your belkin router to enjoy the freedom of connecting wirelessly.

Upgrade 802.11a, 802.11b, and 802.11g devices to 802.11n

Tips5: Although wireless-G (802.11g) may be the most common type of wireless network, wireless-N (802.11n) is at least twice as fast and it has better range and stability. Wireless-N is backward-compatible with 802.11a, 802.11b, and 802.11g.

If you're using wireless-B or wireless-G and you are unhappy with your network’s speed and performance then consider replacing your router and network adapters with wireless-N equipment. Choose wireless-N. Because Linksys router setup is simple and it is powerful and secure too.

Feel free to get online technical support to fix your computer problems. Just Call on Toll-Free number(1-866-541-1792) & get 24*7 expert help for online diagnostic and troubleshooting.

See also: How to set up a Belkin N F5D8236-4 wireless router >>

March 21, 2012

Why my Dell laptop dvd drive is not working?


There are many reasons that your Dell DVD drive may not work properly. Occasionally, the cause of the DVD drive failure or requirements to operate the drive is incomplete. Follow below steps if you are getting dell DVD issue on your dell system & find dell help to fix it again -


Step1: First open the "Device Manager" to check for any error messages related to the device and click on "Start" and select "Control Panel

Step2: Now double-click on the "System" icon then click on the "Hardware" tab and click the "Device Manager" button. A new window appears, and displays whether the device is working properly. If there are any errors, click the "Troubleshoot" button and follow the given onscreen instructions.

Step3: Check the DVD that you are trying to use to and ensure that it is free of dirt and scratches and the proper format compatible with your drive. (…also find here what to do if your dell laptop's wireless is not working…)

Step4: Now download the latest driver updates for your DVD drive model from Dell website & install it.

Step5: Now uninstall any drivers that may be on your computer from previous DVD drives.

Step6: Also check on Dell website that your machine has the minimum requirements to operate the drive.

Now restart your computer & check your DVD drive.

Feel free to get online technical support to fix your computer problems. Just Call on Toll-Free number(1-866-541-1792) & get 24*7 expert help for online diagnostic and troubleshooting.

March 20, 2012

Why is my HP printer always busy?


It is very common hp printer always busy problem for both, whatever single PC or between shared computers. Whenever you try to print, printer always indicate that it is busy & it will take time for print. So, what do you think about hp printer always busy message? It is actual busy or it is something wrong in with printer setting. I suggest that it is very common problem with printers & can be occur after some changes in printer setting.

So if you are facing same problem with your printer. Now its time to check & modify your system and printer setting again. Find here hp support for fix your hp printer always busy problem. Follow steps -
 
Why is my hp printer  always busy?
Step1: Now step-by-step go to "Start -> Control Panel -> Services" and make sure the print spooler is set on automatic and started. Do so if either isn't the case. Do you get the same error no matter which computer you use on the network?

If the problem still exists, try this step 2 below – (…also find common hp printer error codes and solutions…)

Step2: Select the printer by "Start -> Control Panel -> Printers" and click on "properties" and set the printer to print directly and not use the spooler.  Click "OK" and "reboot".  

Then see if you can print now that the spooler has been removed from consideration.

Recheck the printer sharing section in your network properties to make sure it is properly shared.  Make sure no computer on the network has anything stuck in its print queue.

Check the control settings on the printer itself to make sure they are set properly and are not causing this problem. Take a hp manual as reference for proper setting of printer.

If this problem is still happening, then I suggest only one solution here once again uninstall and re-install the printer, printer software, firmware, and/or drivers and see if that works better this time.

Feel free to get online technical support to fix your computer problems. Just Call on Toll-Free number(1-866-541-1792) & get 24*7 expert help for online diagnostic and troubleshooting.


More hot topics:
·        

March 19, 2012

How to remove McAfee completely from your computer


McAfee is one of the most popular antivirus software which includes the common functions available in modern security programs. But sometimes for some reason, the program may not meet your expectation and you just need to uninstall McAfee antivirus. Find here What's new in McAfee total protection 2012.

How to remove mcafee completely from your computer
You can easily remove McAfee security from control panel (add/remove) option but that might not work every time. Even after you remove McAfee antivirus, other antivirus software’s might say that you have McAfee antivirus still installed on your system and first uninstall it. (also learn here about latest McAfee data loss prevention guide....)

To solve this problem, McAfee support its own removal tool (MCPR.EXE) which completely uninstall McAfee internet security and the previous undeleted McAfee files as well -

Step1: So first you need to remove McAfee product from control panel for completely uninstall McAfee antivirus.

Step2: For completely uninstall McAfee, download "McAfee Consumer products remover tool (MCPR.EXE)" from McAfee website.

Step3: After successfully download MCPR tool, run it.

Step4: After sometime you will receive a cleanup successful message.

Step5: Now its time to restart your computer.

You have done it! Your system is now ready to again install other antivirus properly.

Feel free to get online technical support to fix your computer problems. Just Call on Toll-Free number(1-866-541-1792) & get 24*7 expert help for online diagnostic and troubleshooting.

See also: How to get McAfee to scan your computer >>

March 16, 2012

How to install a Dell printer


Dell offers variety of printers with different sizes, looks & features. Whether you have a laser jet that capable of producing professional-grade color or you are using the affordable ink jet, they are all tailored to meet large or small office needs. (Also find here how to restore a dell computer to factory settings  ...) 


Before installing any dell printer, must read the dell help manual guide provided by dell for installation. The installation of dell printer is a easy procedure that allows your computer to communicate with the printer to perform the desired functions. With following easy steps, you can install it within minutes & use it according as your needs. And the steps are -

Step1: Insert original dell printer driver CD in your computer that will be automatically detected by your computer and open the installation window. If it will not show, open CD-ROM from my computer.

Step2: After open the CD-drive you find a terms & condition form, and click on "I accept" radio button and select the location to install the printer driver in system.

Step3: Now install the driver completely with following all instruction and after that restart your computer now.

Step4: Now navigate to the printer driver’s page and select the drivers that are needed for your printer. Every driver is listed under the printer it supports. 

Step5: Now choose your OS and click on "Download Now" button.

Step6: After download it, follow the final prompts to install the printer driver and restart your computer.

Now connect your dell printer with your computer and finally it is ready to use.

Feel free to get online technical support to fix your computer problems. Just Call on Toll-Free number(1-866-541-1792) & get 24*7 expert help for online diagnostic and troubleshooting.
See also: What to do if your dell laptop's wireless is not working >>

March 14, 2012

Top HP printer problems - How to fix It


HP, I think everyone is well familiar with this name today, and the leader of top class printers also. So, when they're generally very reliable, even in the most demanding of environments then why are still problematic from time to time and what are these problems. There are many critical problems for all IT professionals when think about online technical support for printers to fix these hp printer problems.

Top Hp printer problems - How to fix It
So I am discussing here what the top Hp printer problems are and how to fix it-

Paper Jam Problem -

The first and very common Hp printer problem, when you say that why paper is jam? When all are right. Are you check your paper quality, paper type either you are using dirty paper or wrong paper setup in printer. I think any printer that holds the paper vertically and then pulls it down through the printer invariably ends up having paper jam problems. When this problem occurs, for removing this paper jam, always pull the paper in the direction of the paper path, because pulling it backwards can severely damage the printer.

Faded Printing on Paper -

It is second and very common Hp printer problem when you print a page and print quality is faded. There may be very reasons for faded printing like print density is set too low, printer is getting low on toner or someone modified the printing setting. If the toner is low, simply removing the cartridge and shaking it to redistribute the toner more evenly can temporarily resolve the problem until you can replace the cartridge.

Ghosting Problem -

Ghosting problem will not damage your computer, but it will occur when the page prints properly but a much lighter copy of the image also prints elsewhere. This problem can be cause of supplying power to the printer. So first check that power is properly plugged in printer or not. Ghosting can also be caused when consumable printer parts are near the end of their life. All of the consumable parts in a printer are rated for a certain number of pages. Once a printer gets near that magic number, you'll need to replace those parts to eliminate ghosting.

Printer Toner not stays on the Paper -

There are a few possible problems like there may be toner residue left inside the printer after clearing a paper misfeed or words and images come off the paper when a hand is run across them. The solution is to replace the fuser assembly. Repairing a fuser assembly is generally not recommended because the fuser is considered a consumable printer part and not worth the time or effort to fix. Second, the toner cartridge may be defective and letting too much toner out at one time. In a black-and-white laser printer, the solution is to replace the toner cartridge. In a color laser printer, only replace the cartridge that is exhibiting the problem. Third, some toner may have spilled in the printer. If so, you'll need to clean it out.

Not find a driver for a particular OS –

It is another very common problem occurs when you see that a printer driver is missing from your system. The best solution of this problem is, consults the printer manual and find out what printers the drivers will emulate.

HP printers are considered to be among the most reliable in the industry. But problems are a problem that can occur at anytime with anyone. So these are very common hp printer problems that occurs when anything going wrong in your printer. Find here Hp support for printer and what to do when your printer goes down.

So I think this guide interact you with most common printing problems and tips to fix Hp printer problems quickly.

Feel free to get online technical support to fix your computer problems. Just Call on Toll-Free number(1-866-541-1792) & get 24*7 expert help for online diagnostic and troubleshooting.

March 12, 2012

How to dual boot when Windows XP was installed after Windows 7?

One of the big benefits to creating a dual-boot system is that it gives you the opportunity to get up to speed with the new operating system, while still maintaining access to the old one. It also keeps all of your apps and data files intact while you migrate them over to the new OS at your own pace.

How to dual boot when Windows XP was installed after Windows 7
It seems pretty straightforward to dual boot those versions of Windows (windows 7 & windows Xp) when the newest is installed after Windows XP. But the inverse isn't happening on your machine? I think you tried even editing the BOOT.INI file, but the boot just freezes or displays that a file is missing when you will try to boot another partition.

So I am discussing here very common Windows 7 problems like how to dual boot when Windows XP was installed after Windows 7 -

Step1: NTLDR can't boot Windows 7 operating system so you need to reinstall the boot manager.

Step2: Run Windows 7 install CD and choose "Repair" and "Command Prompt".

Step3: At the prompt, do a "bootrec /RebuildBCD" to write down a new bootloader. 

Step4: After that you can get Windows XP back into the boot manager manifest.

I can't promise that this is going to keep Windows XP in the boot order, but it will restore the ability to boot Windows 7. (also find here how to dual boot with windows 7 and windows 8 on a computer)

Partitions of Disk:

If your computer is outfitted with XP and you plan on upgrading it to Windows 7 operating system, you have essentially only two ways to go about it. You can wipe your system's hard drive and perform a clean install of Windows 7 (what Microsoft also calls a "custom installation"), or you can partition your hard drive and install Windows 7 in its own partition, leaving XP intact in its own partition.

Each operating system must be installed on a separate partition. When installing Windows XP as the first step, do not use all of the existing available disk space. Leave at least 20GB of free hard disk space, or ensure that another partition exists that is at least 20GB in size. This is the minimum recommended disk space for a Windows 7 installation, but it should ideally be larger.

Feel free to get online technical support to fix your computer problems. Just Call on Toll-Free number(1-866-541-1792) & get 24*7 expert help for online diagnostic and troubleshooting.


March 05, 2012

How to fix if sound not working on your Dell laptop


If your DELL laptop does not producing any sound then its time to check that what is problem actually. Start from basic and check more resources for Dell help  -

Step1: First, check that audio cables are plugged into the right audio jack or not. Sometime this cables are plugged into wrong audio jack, cable come out when moving your laptop on table or may be cable has been fired up. If everything is OK now check your laptop sound device setting.

Step2: Open "Control Panel" and select "Sounds and Audio Devices".

Step3: Now double click on "Volume" icon and verify the mute button is unchecked. If the volume is turned down, drag the volume cursor up to see if you can hear anything. If you are using Windows 7 operating system,it may be possible that this is Windows 7 low volume problem, need to fix it.

Step4: You forget to install sound driver during installing operating system on your laptop? So first check that drivers are properly install or not. If it is not install, install it. If already installed, try to update it.

Step5: Still you are not getting any sound on your dell laptop so it also possible that the sound card is possibly dead. If the computer uses on-board sound (meaning there is no separate card with sound jacks on it), that is more problematic. That part on the board cannot be replaced without replacing the whole motherboard, normally. In either case, install a new sound card and use its jacks for audio.

Feel free to get online technical support to fix your computer problems. Just Call on Toll-Free number(1-866-541-1792) & get 24*7 expert help for online diagnostic and troubleshooting.

March 02, 2012

How to get rid of a Trojan horse

Viruses are ever-present and dominant on the Windows platform. It doesn’t matter how much you are careful against it, there is always a chance that your computer gets infected with a virus.
If you are contentiously facing Trojan horse virus problem in your computer and you want a proper solution to Trojan virus removal so here is proper guide for how to detect  and remove a virus from your computer

Scan your system with Antivirus:

Before scanning your computer with antivirus, be sure that antivirus should be a latest version and latest updated. Now before choosing the scanning operation on your computer set the harder scan option in your antivirus & set the antivirus to scan within archives and choose wisely when you specify items to exclude from the scan or leave everything out for scan.


Now full scan of your computer, but also keep in mind that there are also some limitations of antivirus software. So after full scan of your computer, perform scanning operation on your computer again in safe mode.


Scanning the system in Safe Mode:

If you want total protection against Trojan horse so it is very important to remove virus in safe mode after perform remove virus from antivirus in normal mode. Because there will be some infected files might be locked by the operating but it may be again harmful for your computer in future. For increase your antivirus’ odds to detect and clean the virus, you should restart the computer and boot into safe mode and then perform a thorough scan of your system.

Feel free to get online technical support to fix your computer problems. Just Call on Toll-Free number(1-866-541-1792) & get 24*7 expert help for online diagnostic and troubleshooting.